Frequently Asked Questions

FOR DOMAIN UPDATE

battery-pack.jpg__PID:7c9f9481-d797-45ba-a30f-b7fe29b7257a

Frequently Asked Questions

FOR PRODUCT

heated-vest-black-faq (1).jpg__PID:600ef073-f473-42fc-a291-0487215434ef

Frequently Asked Questions

FOR BATTERY

battery-pack.jpg__PID:7c9f9481-d797-45ba-a30f-b7fe29b7257a

Frequently Asked Questions

FOR ORDER

contact-us.jpg__PID:c0c04054-9e53-4adb-bb66-a2ff9b0bfd57

Frequently Asked Questions

FOR SHIPPING & RETURN POLICY

shipping-and-return.jpg__PID:40549e53-0adb-4b66-a2ff-9b0bfd577d8f

Frequently Asked Questions

FOR VENUSTAS HEATWAVE CLUB MEMBER

venustas-member.jpg__PID:549e530a-dbfb-46a2-bf9b-0bfd577d8f5e

FOR TROUBLE SHOOTING

Venustas Heated Apparel Troubleshooting Guide [2024 Update]

Venustas Heated Apparel Troubleshooting Guide [2024 Update]

Got a snag with your Venustas heated gear? No worries – we're here to help! Check out our troubleshooting guide, made simple to guide you through any issues you might encounter with your heated apparel.

How to Charge Your Venustas Battery?

How to Troubleshoot Venustas Battery Not Working

Is your Venustas battery giving you trouble? Don’t fret—help is here! We’ve put together this cheerful guide to get your battery back in action. Whether it’s not charging, charging slowly, or just being a bit moody, we’ve got the tips and tricks to revive it.

How to Charge Venustas Battery?

To charge your battery, follow these steps:

  1. Connect your battery to the USB cable.
  2. Plug into one of these three power sources:

Wall power outlet.
Plug your USB charging cable into a USB power adapter (not included), then plug the adapter into the wall.

Computer.
Plug your charging cable into a USB 2.0 or 3.0 port on a computer that is turned on and not in sleep mode.

Power Accessory.
Plug your cable into a docking station or other certified accessories.

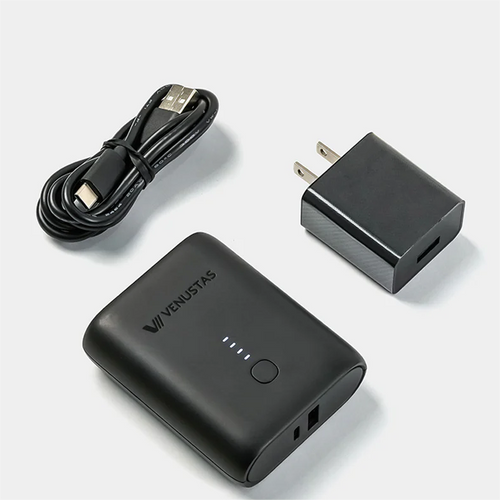
As part of our efforts to reach our environmental goals, Venustas no longer includes a battery charger in the box. We believe this small change can make a big difference for our planet. 

Venustas battery is compatible with a wide range of chargers, including third-party adapters with Type-C ports that comply with the specified input requirements and applicable safety standards.

  • Model: Venustas-7500 / Venustas-10000
    Input specifications: 5V⎓3A, 9V⎓3A, 12V⎓2.5A, 15V⎓2A, 20V⎓1.5A
    Charging time: Fully charges in 2–3 hours with a 20V⎓1.75A (35W) power adapter.
  • Model: Venustas-6000
    Input specifications: 5V⎓3A, 9V⎓2.22A, 12V⎓1.67A
    Charging time: Fully charges in 2.5 hours with a 12V⎓1.67A (20W) power adapter.

Note: Adapters without the required outputs cannot charge the battery. 

Common adapters including those from laptops like Apple MacBooks or HP devices, as well as wall outlets or power strips with USB ports, can safely charge your battery. Below are the charging sources you can use to charge your battery.

Type 1:

Type 2:

If you need a charger adapter, we’ve got you covered:

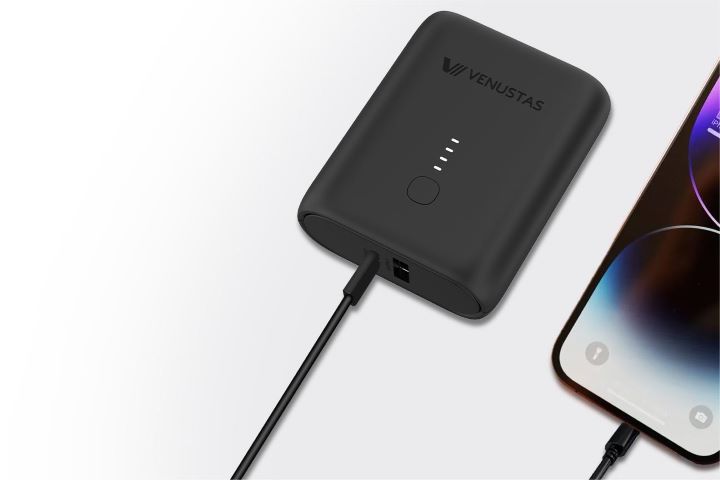
When your battery charges, the indicator lights blink to show the charging status. When the battery is fully charged, all four indicators light up without blinking.

Battery Indicators

If your battery won’t charge

Follow these steps and try again after each:

  1. Check your adapter’s output and send us a photo. It must support at least one voltage and current combination for your battery. Higher output chargers that support USB-C Power Delivery are compatible because the battery will adjust voltage and current for safe charging. For example, Venustas-7500 and Venustas-10000 accept up to 20V⎓1.5A, which can be safely charged with an HP adapter that outputs up to 20V⎓3.25A.
    > Model: Venustas-7500/10000: 5V⎓3A, 9V⎓3A, 12V⎓2.5A, 15V⎓2A, 20V⎓1.5A  
    > Model: Venustas-6000: 5V⎓3A, 9V⎓2.22A, 12V⎓1.67A
    > Note: Adapters without the required outputs cannot charge the battery. 
  2. Check your charging cable and USB adapter for any signs of damage, such as breaks or bent prongs. Avoid using damaged accessories.
  3. Plug into a wall outlet and ensure your charging cable, USB wall adapter, and the outlet or AC power cord are securely connected, or try a different outlet.
  4. Remove any debris from the charging port of your battery, then firmly connect it to your charging cable. If the charging port is damaged, your battery may need professional attention.
    Batter charging port
  5. Charge your battery for half an hour.
  6. If it remains unresponsive, try a different USB cable or charger. Venustas battery is compatible with all kinds of power adapters or third-party adapters that comply with applicable safety standards, including power adapters with Type-C from laptops like Apple and HP.
  7. Let your battery charge for another half hour.
  8. If your battery charges after replacing the charger or charging cable, please contact our customer support team and we will send you a new charging cable. If your battery still won't power on or charge even after replacing the charger and charging cable, please contact our customer support team and provide a clear photo of the silkscreen print on the back of the battery. We will check it and exchange a new battery for you.

If your battery charges slowly

battery charge slowly

Follow these steps and try again after each:

  1. Check if you use the correct charger. 
    > For optimal charging of the Venustas-7500 battery and Venustas-10000 battery, we recommend purchasing a 20V/1.75A (35W) charger for a full charge in 2-4 hours. Or you also can use the power adapters (with a Type-C port) from laptops such as Apple or HP instead of the 35W charger. If you choose to use a 5V/2A or 5V/3A charger, please note that the charging time may extend to around 10-15 hours. 
    > For the Venustas-6000 battery, we suggest using a 5V/3A charger, which will achieve a full charge in about 4 hours.
  2. If the battery charges slowly even use the correct charger, please check for any damage or debris on the charging port and charging cable.
  3. Plug into a wall outlet and ensure your charging cable, USB wall adapter, and the outlet or AC power cord are securely connected, or try a different outlet.
  4. If it’s still charging slowly, we recommend trying a different charging cable. Venustas battery is compatible with all kinds of charging accessories that comply with applicable safety standards.
  5. Let your battery charge for half an hour.
  6. If your battery charges at a normal speed after following these steps, please contact our customer support team for assistance with a new charging cable. If you continue to experience slow charging, kindly let us know your battery model, charging time, and charging conditions, and we’ll be happy to help you.

      If your battery stopped charging at 80 percent

      Venustas Optimized Battery Charging helps slow down battery aging by minimizing the time your battery stays fully charged.

      Your battery might get a little warm while charging. To extend its lifespan, if the battery gets too warm, our software may limit charging above 80%. Once the temperature drops, charging will continue.

      For best results, try moving your battery and charger to a cooler spot.

        If your battery cannot charge your phone

        If your battery cannot charge your phone

        Follow these steps and try again after each:

        1. Check if you use 12V heated apparel. Kindly note that our Venustas-7500 battery and Venustas-10000 battery cannot charge your phone while powering the 12V heated apparel. If you would like to charge your phone, we recommend not using the 12V heated apparel during that time.
        2. Check if your battery has power.
        3. Please try recharging your battery for about 1 minute and check for the blinking indicator light, which means the battery is charging. Our batteries have an automatic protection feature. When the battery's DC port comes into contact with metal, the battery will automatically shut down. By recharging for 1 minute, you can reset this feature and allow the battery to start charging properly.
        4. Please plug your phone in again with the correct charging cable.
        5. If the problem insists, we recommend trying a different USB cable to charge again.
        6. Double-check that you’re using the correct charging port. Kindly note that the Venustas-6000 battery only supports phone charging through the USB-A port. Venustas Battery Port
        7. If the phone still cannot be charged, please contact our customer support team for further assistance.

        If your battery cannot charge your heated apparel

        If your battery cannot charge your heated apparel

        Follow these steps and try again after each:

        1. Check if your battery has power.
        2. Please try recharging your battery for about 1 minute and check for the blinking indicator light, which means the battery is charging. Our batteries have an automatic protection feature. When the battery's DC port comes into contact with metal, the battery will automatically shut down. By recharging for 1 minute, you can reset this feature and allow the battery to start charging properly.
        3. Test the battery with your phone and other mobile devices. Kindly note that the Venustas-6000 battery only supports phone charging through the USB-A port.
        4. Plug the apparel cable into the battery, and then press the power button for about 3 seconds to see if it turns on.
        5. If the apparel doesn’t turn on, please check for any issues with the heating elements.
        6. If there are no issues with the heating elements, please contact our customer support team for assistance in exchanging for a new battery.

            Learn More 

                Heated Apparel Not Working? Here’s How to Fix It Fast

                Heated Apparel Not Working? Here’s How to Fix It Fast

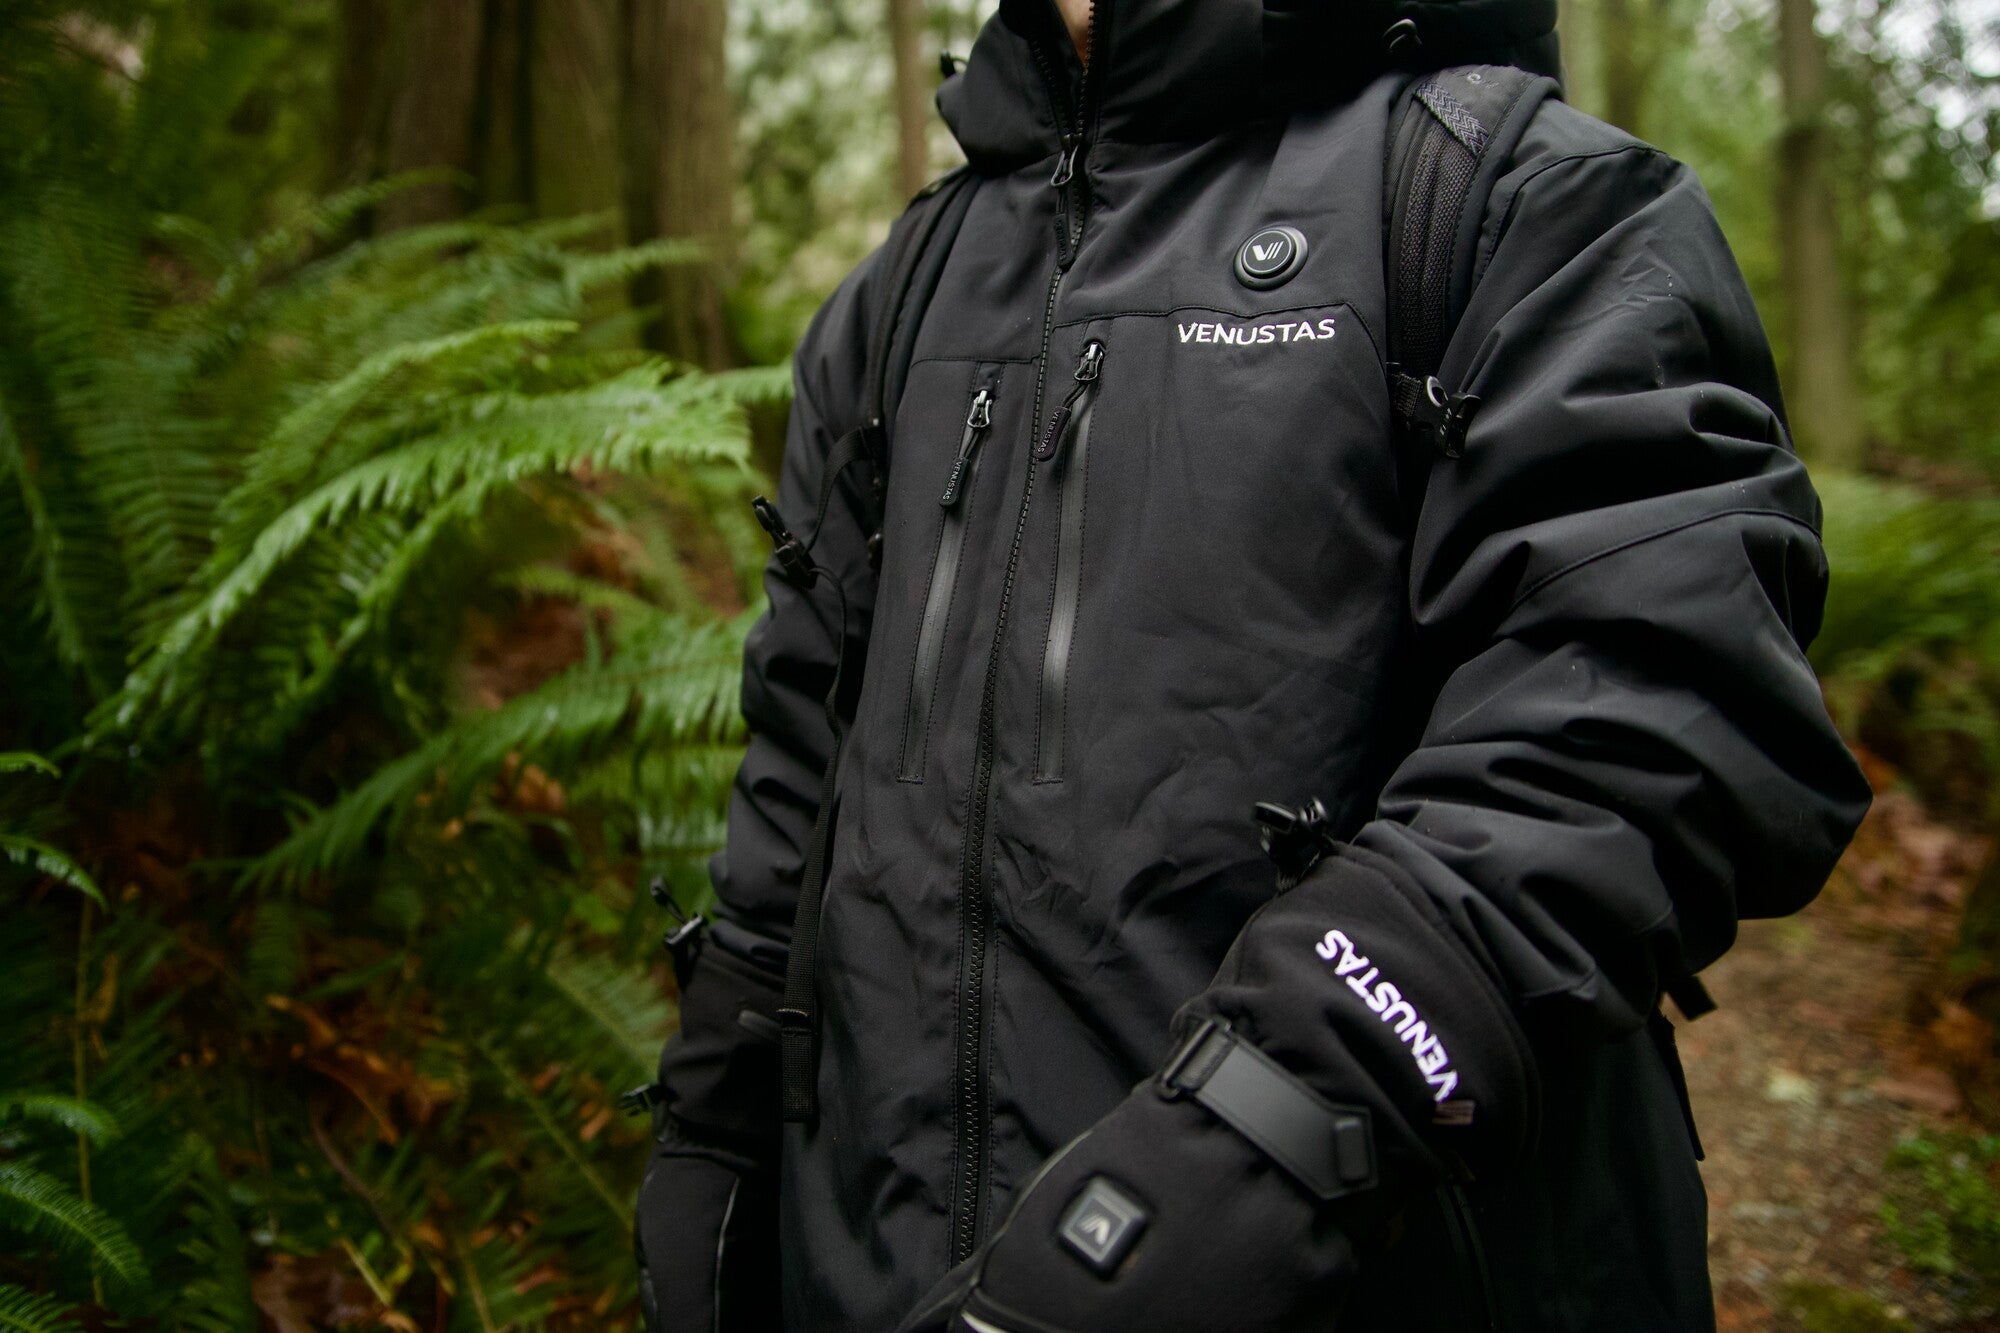
                Having trouble with your heated apparel not warming up? Don’t worry—we’ve got you covered. This guide walks you through simple steps to identify and fix common issues, so you can get your heated jacket working again in no time.

                If you're experiencing battery-related problems or other technical issues, be sure to check out our [Venustas Battery Not Working Troubleshooting Guide] and our [FAQs] for additional help.

                Check the Battery:

                1. Recharge the battery for 1–5 minutes and look for the blinking indicator light—this means the battery is charging.

                2. Try using the battery to charge a phone or another device.

                Connect the Battery to the Apparel

                1. Plug the apparel cable into the battery’s DC port.

                2. Watch the power button on the apparel—if it flashes red, white, and blue briefly (or just red for square-button models), it means the connection is recognized.

                Connect to the battery, it flashed red, white, and blue

                Troubleshoot the Connection

                1. If the button doesn’t flash, unplug and reconnect the cable to ensure a secure connection.

                2. If the battery is functional but the button still doesn’t flash, there may be an issue with the heating elements.

                connect to the battery's DC port, it flashes red

                  Try Powering It On

                  1. If the button flashes during connection, press and hold it for 3 seconds to enter preheat mode (you should see a red light).

                  2. If no light appears after pressing, the heating elements may still be the issue.

                  If none of these steps resolve the problem, please send a short troubleshooting video along with your order number and the S/N (Serial Number) located beneath the care label to our customer support team. We’ll help you resolve the issue promptly and ensure you receive a satisfactory solution.

                  If the Heating Elements Aren’t Warming Up After Turning On

                  Turn On the Heated Apparel:

                  1. Connect the apparel cable to the battery.

                  2. Press and hold the power button for 3 seconds to turn it on.

                  3. The power button should flash red, indicating the 5-minute preheating phase. After that, it will automatically switch to the medium heat level (blinking white light).

                  Give It Time to Heat:

                  1. If the apparel powers on correctly, zip it up and wait 1–5 minutes to allow the heat to build.

                  2. Important: Ensure the battery is placed in its designated battery pocket—not on a heating element.

                  3. Then, touch the garment to check if the heating elements are warming up.

                  Still Not Working?

                  1. If you don’t feel any warmth, please provide your order number along with the S/N (Serial Number) located under the care label.

                  Serial Number

                  2. Our customer support team will help you arrange an exchange.

                  If the Heating Element Isn’t Getting as Hot as Expected

                  Power On the Apparel

                  1. Connect the battery to your heated clothing.

                  2. Press and hold the power button for 3–5 seconds to turn it on.

                  3. Then, press the button once until the light turns solid red—this sets the apparel to the highest heat setting.

                  Retain Heat

                  1. Zip up the apparel and wait 1–5 minutes to allow the heat to build and circulate.

                  2. For best results, check the area near the heating elements by touch or use a thermometer to measure the temperature.

                  Keep in Mind

                  1. The heating temperature is regulated by internal elements, so the surface warmth may feel slightly lower than expected.

                  You're now all set to troubleshoot your Venustas heated apparel! If issues continue, don’t hesitate to reach out—our friendly customer support team is here to help. Stay warm and enjoy every adventure!